
How To Build Your Very Own Hypertrophy Program In Under A Hour
Want to know how to make your own hypertrophy program? Follow these simple steps and never pay for a program again!
Step 1: Determine how many times per week you’re able to train. Most people can make great hypertrophy gains following a 3-6 day workout program.
Considerations:
How many days a week can you realistically train for the next 4-8 weeks? Be honest.
How many days a week do you like to train? Some people love training 6 days per week, while others are perfectly content training 3 times per week. Keep in mind, more doesn’t always mean better.
How many days a week are you currently lifting? If you’re currently only lifting twice, it doesn’t make sense to jump straight to 6 days.
How’s your ability to recover? For many people living busy lives, recovery between workouts can take anywhere from 24-72 hours. Recovery is not only influenced by physical stress, but also mental & emotionally stress.
If you’ve followed 5 or 6 day workout programs in the past and found that your performance from week to week did not improve, consider starting with a 3 or 4 day program.
Step 2: Once you’ve figured out frequency, it’s time to make your next big decision. Which split should I follow? No, we’re not talking banana splits here, training splits.
The four most common splits are:
Full Body
Upper and lower body are both targeted during each workout
Upper / Lower
The upper and lower body have separate workout days. This split usually consists of 2 upper and 2 lower body days per week.
Push / Pull / Legs ( PPL)
The PPL split divides the body into upper pushing, upper pressing, and lower body.
Bro Split
The bro split consists of training one to two muscle groups per workout. A typical routine may look something like this: chest, back, legs, delts and arm day.
Considerations:
Novice lifters are able to train muscle groups more frequently compared to intermediate/advanced lifters. This is because newer lifters do not inflict the same stress when compared to a more experienced lifter.
As a novice lifter, there's benefits to training frequently. You get more practice, therefore increasing your skill and force producing capabilities.
In most cases Intermediate to advanced lifters will require >72 hrs between the same muscle groups because of the damage they can inflict. .
There’s no such a thing as a MAGICAL split. They all work, if you work.
Example splits according to training frequency:
3 days / Week
3 Full Body
1 Upper / 1 Lower / 1 Full
4 days / Week
2 Upper / 2 Lower
3 Full Body / 1 Full Accessory
1 Push / 1 Pull / 1 Legs / 1 Accessory
5 days / week
2 Push / 2 Pull / 1 Legs
Week 2 - 2 Legs, 2 Push, 1 Pull
Week 3 - 2 Pull , 2 Legs, 1 Push
Rotating each week
2 Upper / 2 Lower / 1 Accessory
Bro Split
Monday - Chest
Tuesday - Back
Wednesday - Legs
Thursday - Shoulders
Friday - Arms / Core / Calves
Step 3: Chosen your almighty split? Now it’s time for some real action. How much volume do you need? Before pulling out your calculators, divide your muscles into the following groups:
Chest
Horizontal Pressing (Low decline to 30 degree incline)
Back
Horizontal Pulling
Vertical Pulling
Quads
Glutes & Hamstrings
Shoulders
Semi Vertical to Vertical Pressing (>30 degrees of pressing)
Includes medial and rear delts (side & back delts)
Biceps
Triceps
Calves
Core
Other muscle groups to consider training - forearms, neck, upper traps & tibialis anterior - these muscles get plenty of stimulation through compound exercises and don’t need extra love unless you specifically need to bring them up.
If you’re new to lifting and limited in time, isolating the biceps, triceps & calves is not necessary.
If you do have the time, it can be beneficial for several reasons. First, you’ll gain the skill of training these muscles in isolation, which becomes important as you progress. Second, by progressing these smaller muscle groups, we can improve the performance of our big presses, pulls and squats, leading to a better performance & growth overtime. Third, training these muscles in isolation brings a certain level of injury prevention. For example, the bicep and tricep muscles both attach to the scapula, acting as stabilizer muscles during pressing and pulling movements. If these muscles are well trained, the likelihood of experiencing injury decreases. Last and most important, can your arms ever be too big? I don’t think so.
Considerations:
How many sets per muscle group do you usually train?
If you’ve taken some time off from training, you can make great progress with performing very few working sets per muscle.
If you’re new to lifting, I’d say a good place to start is between 5 - 10 working sets per muscle group. If you’re more advanced, have solid exercise execution and can handle heavy loads, it’s better to start at the lower end of the 5 - 10 working sets, unless you know you require more.
If you’ve been consistently training and your # of working sets has stayed relatively static, consider either increasing the total number or deloading the body by decreasing the # of sets to a “baseline” number, also known as the minimum effective volume.
If your set, reps and loads have remained constant, likely you’ll need to increase either sets, reps or load to drive the adaptation process forward.
If you’re still early in your bodybuilding journey, keep the # of sets that you perform per muscle group relatively consistent
If you’re far along your bodybuilding journey and carry significant mass, consider allocating sets from your stronger body parts to your weaker body parts
Factor in your training time. If you only have 1 hour to train, aim for the lower end of sets per muscle group so that you’re not rushed.
Quality of sets should always take precedence over the # of sets. Ensure that the sets you do, are of high quality from an execution standpoint. Ideally, your first rep should look like your last rep in terms of execution.
Step 4: You’ve got your working sets figured out, nice job. Now it’s time to rank the priority of your muscle groups. Doing this will help determine which exercises to program first.The fresher you are for a given exercise, the more intensity you can give to that specific muscle group to progress.
Considerations:
Ideally, you want to prioritize muscle groups that are lacking. Some of the greatest physiques that you see are well proportioned and balanced, something that judges take into account if you ever wanted to compete in bodybuilding.
Having big arms and chesticles are cool, but you’ll get greater satisfaction if you develop your entire body equally.
If you’ve picked a full body split, rank all the muscles groups together. If you’ve decided to perform a Upper / Lower, PPL split, rank each muscle group separately within each respective split.
Here's some examples.
Full Body Routine:
Chest (2)
Back (4)
Quads (1)
Glutes (4)
Hamstrings (3)
Shoulders (5)
Biceps (8)
Triceps (6)
Calves (7)
Core (9)
PPL Routine:
Push
Chest (1)
Shoulders (3)
Triceps (2)
Pull
Vertical Pulling (2)
Horizontal Pulling (1)
Biceps (3)
Legs
Quads (1)
Hamstrings (2)
Glutes (4)
Calves (3)
Core (5)
When you start creating your workout, you’ll now know which exercises need to come first based on the rank of each muscle group.
Step 5: You ranked pecs and biceps as your number one priority? I’m not surprised one bit ;-). Now things are turning up. Let’s figure out which exercises you’re going to use.
Considerations:
Compound exercises should take precedence over isolation exercises.
Example: chest presses over chest flys or squats over leg extensions. Ideally you should have a mix of both compound and isolation exercises in your program.Limited on time? Always make sure you get in your compound movements before doing your isolation based movements.
Don’t pick exercises based on what other people are doing. Pick exercises that you enjoy the best and work the target muscle group, have a reasonable stimulus to fatigue ratio & do not offer any unnecessary injury risk. This is different for everyone, based on factors such anatomical structure, muscle attachments, injury history, training age and so much more! Just because you see professional bodybuilders doing XYZ movement, does not mean you need to perform them!
In my experience, picking 1-2 main compound movements per muscle group per block of training is ideal. With each new training block, these movements can be cycled to prevent overuse injuries & training staleness. The compound movements should use a barbell or other specialty bar.
In addition to selecting 1-2 main movements, you should choose 1-2 assistant compound exercises. The only difference with these movements is that they should challenge the same muscle in a different position of its range. This is where machines, cables and accommodating resistance can be beneficial.
You'll need to select 1-2 isolations per muscle group. Again, these are the first to go if time is limited.
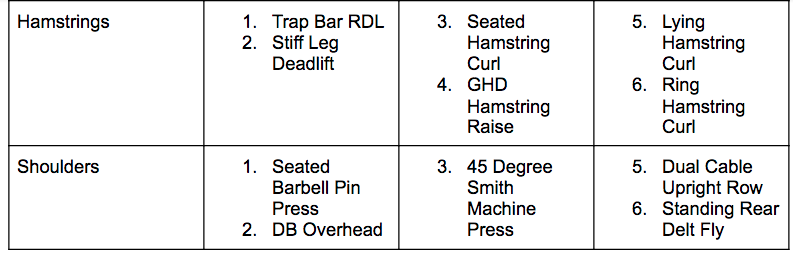
Below are some of my favourite exercises that I program for myself and clients. Again, these are just examples of hundreds of possible exercises, so don’t think that they must be included in your program.


Step 5: Great job keeping along! You’re almost done, just a few more steps. Now it’s time to determine rep ranges for your program. For hypertrophy based training, I like the following rep schemes.
15,12,10 - Non Functional Hypertrophy
12,10,8 - Hybrid of Functional and Nonfunctional
10,8,6 - Functional Hypertrophy
For simplicity sake, I like to categorize hypertrophy training into 2 groups.
Non Functional Hypertrophy
Non functional hypertrophy refers to increasing the size of the muscle cell through cell volumization. Many refer to this as sarcoplasmic hypertrophy or “cell swelling’. With this form of hypertrophy, we see increases in water & glycogen retention through the upregulation of creatine synthase, and glycogen synthase enzymes, the creation of new ribosomes, mitochondria and more. These adaptations occur mostly through higher repetition & shorter rest based training.
Functional Based Hypertrophy
Functional hypertrophy refers to the creation of new muscle cells (actin & myosin) and its corresponding structural based proteins (titan, nebulin, dystrophin etc). These proteins are what ultimately drive muscle contraction. These adaptations occur with moderate repetition based training (6-10).
Considerations:
In general, when starting a new program, it’s best to start with a program that's significantly different from the one you’ve been doing. If you’ve been doing higher repetitions for sometime, you could benefit from doing lower repetitions and vice versa.
For someone returning to training after a layoff, I recommend starting with the 15,12,10 rep scheme. As this training tends to be higher in volume, it’s better for driving fitness abilities & body recomposition, all which increase motivation and success in future blocks. From there, you would transition into a phase of 12,10,8 and finally finish with a block of 10,8,6.
Below is a table that shows how I like to program my rep ranges based on the movement type.

Generally I like to keep rest periods shorter with my higher rep training schemes and increase rest as rep schemes lower. This helps to drive the mitochondrial & fitness based adaptations with higher rep schemes, and damage/strength based adaptations with lower rep schemes.
Considerations:
With higher repetition based programs, consider biasing exercises that challenge the mid to short range more frequently than the lengthened. Think more machines, cables and free weights including some accommodating resistance.
With lower repetition based programs, bias many of your exercises to be challenging in the lengthened position.
Step 6: If you’ve read through all the steps and considerations it's time to put your program onto paper!
You’re more than welcome to do this digitally but I appreciate pen and paper. If you’re working with paper turn it so that it’s in landscape mode. At the top of the page, write out Monday through Sunday (See Table below). For this example I’m using a 4 day Upper / Lower split.
You must decide which days you'll be training your split and write the muscle split you’ll be training on the day you’ve chosen. There's many ways to do this, just make sure that you are giving yourself enough time in between workouts to recovery.

Once you have something that looks somewhat like the above table you’ll need to divide up the number of working sets you’ve selected per muscle group. In my case, I’ve chosen 5 sets per muscle group to start (8 for back). Given I have 9 muscle group categories, I’ll be starting with 48 (3 extra for back because my back needs improvement) total working sets per week.
Chest - 5 sets
Back - 8 sets -> 4 each for vertical and horizontal pulling
Quads - 5 sets
Glutes & Hamstrings - 5 sets
Shoulders - 5 sets
Biceps - 5 sets
Triceps - 5 sets
Calves - 5 sets
Core - 5 sets
If desired, you can perform the total # of sets of each muscle group over 1 or 2 two workouts. Either way works fine. In my example, I’m going to do a mix of both depending on the muscle group. The next step is to write out your muscle groups and set numbers as follows. Additionally, write out the muscle groups in order of importance (step 4) from highest to lowest priority. This can be done in your workout schedule like so.

Now it’s time to fill in the exercises, rep ranges and rest periods that you’ve selected. You don’t need to use every exercise you picked. In most cases, less is better.

You’re all done! Now all you need to do is get your butt to the gym. Before I sign off, I’d like to leave you with a couple more considerations.
Your program is adjustable! By no means is it set in stone. If an exercise you picked doesn’t feel right, swap it out. If you find you need more or less volume for a given body part, add it in or take some out.
Make sure that there's some level of progressive overload throughout the weeks. That can be either in the form of adding load, reps or sets, adjusting rest periods, altering exercise tempo or a combination of several variables. Many will argue that adding sets is best, or adding load is better, but in my experience a combination of both seems best. Because the aim is to be able to make continued progress over the course of 4-6 weeks, make sure that you don’t start the program at 110%. This will make continued progress difficult and likely leave you injured or burned out. The goal is to stimulate, not annihilate.
If you’re crunched for time, supersets are a great option to get more work done in a shorter time. Super sets involve 2 exercises back to back before your regular rest period. When picking exercises to superset, make sure that you pick different muscle groups to ensure performance isn’t negatively impacted. In some cases, supersetting big compounds like squats or deadlifts will not work due to the cardiovascular demands.
Great superset options include:
Chest and Back
Biceps and Triceps
Compound Lower Body and Isolation Upper
Shoulders and Back
Core and Calves
And many more… get creative.
I’ll leave you with this. Programming is an art and it takes practice to get good at it. You’ll likely find that the perfect program on paper doesn't always equate to perfection in the gym. But that’s part of the entire learning process and why programs need to have flexibility and room for change. If ever someone is telling you about how great & superior their program is in order to sell you something, be aware. Like I’ve said before, there is no such a thing as a magical program. They all work, as long as you’re willing to put in the work.
If you ever have any questions related to programming for physique and strength sport, please feel free to reach out to me at matthew@endurehp.com . I’d love to help!